Hole 1 - Par 5
A relatively easy starting hole. This Par 5 gives you the opportunity to settle into your game. The fairway looks fairly straight forward from the tee box, however, avoid hitting your tee shot left as the entire the entire left side of the hole is out of bounds. The second half of the fairway slopes from right to left, so aim your shot slightly right to avoid trouble. The green is built on three levels so make sure of the yardage if you wish to attack the pin.Hole 2 - Par 4
An excellent driving hole with awesome views of the entire estate and the Indian Ocean. Don't let the view distract you, there is work to be done. Aim your tee shot right and be cautious of strong wind. The fairway slopes from right to left and the green itself is surrounded by grass bunkers. The green has various undulations so spend some time reading the green. Hitting the green in regulation does not necessarily mean par.Hole 3 - Par 4
One of the few holes on San Lameer Golf Course that you can really turn the shoulders and hit that really long tee shot. Aim for the left hand side of the fairway. The road on the right is out of bounds. Always take more club than you think. It is far more uphill than it would appear A relatively easy green provided you are on the right level.
Hole 4 - Par 3
In 2005 this hole was selected as one of "The Dream 18" in South Africa Don't let the stroke index fool you; this is a demanding hole that requires an extremely accurate tee shot. The first objective is to clear the dam at the front of the green and the second is to avoid the bunkers at the back of the green.You definitely do not want to chip back towards the water if you can possibly avoid it. Once on the green the putt should be relatively straightforward.Hole 5 - Par 4 Stroke
A fairly short hole but one that demands accuracy off the Playing Tip Tee. You don't necessarily need a driver but you need a club that you hit accurately off the tee. If you have hit an accurate tee shot you should be left with a short iron shot into the green. Take a close look at the green. Three putting on this green is not unusual.Hole 6 - Par 4
A challenging hole with superb views from the tee box. The perfect line is the two tall palm trees on the left hand side of the fairway, use them as your target from the tee. A good drive will leave you with a clear shot into the green although you may find you have a down hill lie. Alternatively you may need to lay up short of the bridge. A large undulating green that you need to study carefully.Hole 7 - Par 4
Probably the most challenging stroke 1 in Kwa Zulu Natal and one which demands respect. If you ever have to play a precise tee shot, this is it. Don't be tempted to go for the green unless you are confident that you will reach it. Play it safe and you could still make par, although for the average golfer a 5 on this hole is a perfectly respectable score. A very large green built on two levels. If you birdie this hole or even par it, you will definitely have something to brag about.Hole 8 - Par 5
After the trials and tribulations of the 7th, this is a comparatively easy hole. If you are not particularly long off the tee, your driver might be the club to use; alternatively a fairway wood may be a better option. A well struck long iron should get you fairly close to the green, but remember it is uphill and you may require more club than you think. This is a tiered green and you need to make extra sure of the pin position before you hit your approach shot.Hole 9 - Par 3
This is the signature hole of San Lameer and definitely one of the most beautiful holes you will ever see. The wind will definitely change the complexity of this hole and needs to be bome in mind. Club selection is paramount Trust your swing and attack the pim If you prefer to adopt a more cautious approach aim a little to the right, but not too much if you don't want to hit your ball into the club house. A relatively easy green to read although there is a ridge which runs through the green.Hole 10 - Par 4
Welcome to the "wet" side of the San Lameer Golf Course. If you thought the front nine was awesome, you will be amazed by the back nine. The 10th hole is just the right hole to get you to refocus after the halfway house. Accuracy is the key; you don't necessarily need a driver. A good tee shot will mean you only need to hit a short iron into the green. Once on the green a par or even a birdie is definitely on the cards.
Hole 11 - Par 4
A beautiful hole with a natural stream running along the right side of the fairway and a dam in front of the green A driver is not always the right club to use. A well struck shot towards the bunkers to the left of the path will give you the ideal lie.
A good tee shot should leave you with a relatively straightforward shot into the green. The cautious and probably the most sensible approach is to aim for the left hand side of the green which takes the dam out of play. The green slopes towards the water so don't be too aggressive with your putt.
Hole 12 - Par 4
Relax, there is no water on this hole and the views from the fairway and green are spectacular. There is also an excellent opportunity to make birdie on this hole. A definite risk and reward hole. For the long accurate hitter it is possible to reach, or be Very dose to the green from the tee, although you will need to choose the correct line.
For the average player a more cautious approach is advisable but you will need to avoid the fairway bunkers. If you are on the fairway you should have a relatively simple shot into the green, but fry and avoid the bunkers surrounding the green. With a ridge running through the green you need to make sure you are on the correct side of the hole.
Hole 13 - Par 5
Welcome back to the water! A dogleg par 5 where course management is key. A drive that passes the corner will leave you with an opportunity to go for the green. If you do not make the corner you will need to lay up. Dependent on your tee shot you either have the opportunity to go for the green or lay up onto the island, which will leave you with a short iron into the green. Don't leave your approach short or you will meet with a watery grave. By the same token try and avoid the bunkers behind the green or you will be left with an intimidating shot. A fairly large green with few undulations.Hole 14 - Par 3
A challenging but scenic par 3 where, if the wind blows, it will definitely effect your club choice. Take sufficient club A ball falling short of the green will result in a difficult pitch. The undulations on the green are deceptive and more than meets the eye.Hole 15 - Par 4
Without the wind a relatively easy stroke 2 where conservative play will be rewarded. A tee shot that lands next to the fairway bunkers will put you in an ideal position. A good drive will leave you with a relatively easy shot into the green, however you need to avoid the bunkers that protect it You also need to be aware of the pin position. A two tier green, however, if you are on the right level you should have a straightforward putt and hopefully walk off with a birdie.Hole 16 - Par 3
Many tournaments have been won or lost on this hole. Accuracy as well as club selection is the key. Take note of the downhill and don't forget about the wind. An undulating green, but not too difficult to read.Hole 17 - Par 5
The natural beauty of this hole is breathtaking and if you are lucky you may see red, grey and even the extremely rare blue duiker. A stream runs right and across the fairway, so club selection is important, as is accuracy. A tee shot that lands on the left hand side of the fairway will put you in an ideal position. Only the very brave will risk going for the green in two. A good second shot Will leave you with a short iron into the green. Remember however, that the fairway slopes from left to right. Although this is one of the biggest greens on San Lameer Golf Course, it is well protected by hazards.
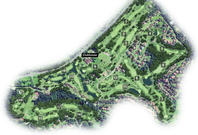
 The San Lameer Resort Hotel Championship Golf Course is definitely the centerpiece of the San Lameer Estate. Beautifully set amongst pristin...