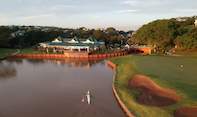
Mount Edgecombe Golf Club is situated on the North Coast of KwaZulu-Natal and boasts two 18-hole championship golf courses - The Woods (Course 1) and The Lakes (Course 2).
The Woods Golf Course at Mount Edgecombe Country Club
The 18 hole Woods Golf Course at Mount Edgecombe Country Club has been revamped by Hugh Baiocchi and is a 25-min drive from Durban CBD.
Hole 1 - Par 4
Being the opening hole you don't need more than a 3 iron or fairway wood, distance required approx. 200m leaving a shot about 100m. Favour left side of fairway.
Hole 2 - Par 4
Perfect driving hole. Aim at the fairway bunker - this will give you a clear second shot in. Stay right all the way.
Hole 3 - Par 3
Testing par 3 very narrow green safe bail out would be left or long.
Hole 4 - Par 4
There are two ways of playing this hole; Leaving your tee shot short of the bunkers, leaving a wedge or 9 iron into the green or taking on the green.
Hole 5 - Par 5
Very short but dangerous par 5. Out of bounds on both sides of the fairway. Recommend your favourite club off the tee. Lay up short of the water hazard, leaving you with a short iron in.
Hole 6 - Par 4
This hole changes depending on wind direction. The ideal tee shot is the right side of the fairway, leaving you with a clear shot over the edge of the water. The right club selection vital as the green is 43m long.
Hole 7 - Par 4
Up hill par 4, favour left hand side of the fairway. Second shot is to an elevated green so don't forget to take one extra club. No problems at the back of the green.
Hole 8 - Par 5
This hole you can open the shoulders and let rip. Position your second shot left of the mounds, this will leave you with an open shot to the left side of the green, taking the front right bunker out of play.
Hole 9 - Par 3
This hole demands a well struck tee shot, best play is to be bng as this will take the water and front bunker out of play.
Hole 10 - Par 4
Favour right hand side of the fairway. Double teir green, second shot to be played to the left side of the green.
Hole 11 - Par 3
Toughest par 3 on the course. Can range from a driver to a 5 iron depending on the player. All hazards are short of the green, so take extra club.
Hole 12 - Par 5
Reachable par 5 for the long hitters. Ideal drive left half of the fairway, second shot favour right side of the fairway leaving you with an open green for your approach shot.
Hole 13 - Par 4
One of the testing par 4's on the course. Tee shot to be placed to the right of the tree on the fairway. Second shot is played to an elevated green, so take at least one club extra, to a well bunkered green.
Hole 14 - Par 5
For most players a 3 shot par. Tee shot to the left of the fairway, second shot keep right, leaving a medium to short iron in.
Hole 15 - Par 3
Mount Edgecombes signature hole playing at 156m, surrounded by water. Playing down hill makes a bit easier, best play would be left side of the green.
Hole 16 - Par 4
Very demanding tee shot, the dam on the right out of bounds, aim left of the 150m marker, unless you want to take on the corner. Second shot plays longer than it boks, as there is dead ground from the mound to the front of the green.
Hole 17 - Par 4
Time for a birdi! Favour the bft side of the fairway leaving you with a short second shot in.
Hole 18 - Par 4
Great finishing hole. Up hill par 4, tee shot right hand side of the fairway, medium to long iron in. Keep clear of the water hazard on the left hand side as it comes into play with approach shot.

 Guests at Mount Edgecombe Estate Lodge can enjoy a golfing experience of a lifetime at The Mount Edgecombe Golf Estate....