Hole 1 - 390m - Par 4
The opening hole at Steenberg Golf Course starts off with a welcoming fairway flanked by bunkers on each side of the landing area. The raised green guarded by a penal bunker in front and run off areas on all sides makes the correct club selection imperative.
Hole 2 - 175m - Par 3
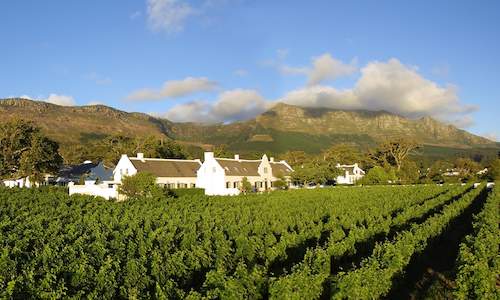
Framed by the Silvermine Mountain and the Steenberg Hotel, lies the second green. The front left bunkers are well short of the putting surface and creates an optical illusion for the distance. The two tiered green sloping from the back to front makes for some interesting pin positions.
Hole 3 - 385m - Par 4
This tight driving hole with its sloping fairway sees your approach to a green that is below the level of the fairway. One needs to favour the right side of the green as balls filter to the left. Missing the green either to the left or long will bring the best out of your short game as the green sits 10m above the steep run offs.
Hole 4 - 325m - Par 4
Encapsulated by twelve bunkers, this short par four is all about strategy. If you lay up short of the cross bunkers you will be left with a shot of about 150m. Alternatively, you can take on the bunkers with the driver and be left with a short iron. This is a birdie hole, but can bite you if your strategy fails.
Hole 5 - 560m - Par 5
If the holes at Steenberg were named, this par five would be called “Long.” This is a true three shot hole and requires three well struck shots to get to the green in regulation. Although pretty straight, the hole is protected by fairway bunkers left and right of the fairway in the landing area. A semi-blind second shot requires good control to avoid the many trees on each side of the fairway. The left to right tiered green looks to be set back into the vineyards and it is critical to place your approach on the correct hemisphere. A par is a very good score on this hole.
Hole 6 - 350m - Par 4
This gentle dog-leg right par four is protected by a 120m long waste bunker on the left hand side and a bunker in the landing zone to the right of the fairway. The green is one of the best complexes on Steenberg Golf Course with four bunkers surrounding it and its several tiers. The green allows for many different pin positions where accuracy is paramount as Out-of-Bounds flanks both sides of the green.

Hole 7 - 165m - Par 3
Featured Hole: Steenberg’s signature hole sees its island green set into sand and water. With Devil’s Peak in the background one must not get side tracked by the task at hand. Finding the putting surface with the tee shot is a great and necessary accomplishment as only the 360 degree bunker can prevent your ball from finding the water if your shot is off target. A par is a great score on this hole.
Hole 8 - 470m - Par 5
This risk and reward par five requires a good strategy off the tee as a mountain stream crosses the fairway at 250m from the tee. If you risk taking on the stream with your tee shot, you can be left with a long iron in, or alternatively you will have to play it as a three shot par five. The green has several run-off areas and it is imperative that you miss these as you will be chipping your next shot back onto the green.
Hole 9 - 360m - Par 4
This up-hill hole plays longer than you think, and a waste bunker flanks the right side of the fairway for the entire hole. Make sure you take an extra club for your approach otherwise the front bunker will catch your ball.
Hole 10 - 370m - Par 4
Flanked by the mountain stream on the right and a lateral hazard on the left, it is imperative that you find this fairway. As the hole is not too long, you can hit a long iron or fairway wood to secure your position on the short grass. The green is protected by the mountain stream on the right and a large bunker in front. The green has several right to left tiers, so try to leave yourself on the correct level.
Hole 11 - 330m - Par 4
This drivable par four has a series of dams down the left side of the fairway while six bunkers protect the driving area on the right. The hole consists of several tee boxes with the safer driving option being to leave yourself a wedge into the well protected green for your approach. If you are feeling confident, you can have a gamble with the driver and either walk away with a birdie or double bogey. This is a classic risk and reward hole!
Hole 12 - 455m - Par 5
The drive is the key to this hole as it is very narrow and requires a forced carry of the waste bunker which crosses the fairway from the left at 200m. The green is reachable in two for the longer hitters, but for most, it is important to have a full shot in for your approach in order to control the ball more easily. The green has several tiers and swales which makes putting difficult.
Hole 13 - 365m - Par 4
One of the toughest holes on Steenberg Golf Course which plays into the prevailing wind allows little margin for error on the approach as this raised green is relentless for poorly judged approaches. Playing your approach from the fairway and missing the series of fairway bunkers left and right will make the hole easier. A par is a great score on this challenging hole.

Hole 14 - 185m - Par 3
Featured Hole: Framed by the Silvermine Mountain lies the largest single green in Southern Africa. The green appears to sit in an amphitheatre and is one of the most photographed holes on Steenberg Golf Course. The hole can play from 100m to 220m depending on the tee and pin positions giving the golfer a new challenge every day.
Finding the huge green which is surrounded by bunkers can make for a tricky putt if you are not in the immediate vicinity, as the green is very undulating. This is a memorable hole, and making a par will make it even more unforgettable.

Hole 15 - 415m - Par 4
The longest par four on Steenberg Golf Course, which plays into the prevailing wind, is the Stroke one for good reason. The landing area of the tee shot is surrounded by bunkers and these need to be avoided if you hope to reach the green in regulation. A stately old oak tree is set into the green on the left side with the green running away from the fairway from front to back. This is a great tough hole!

Hole 16 - 350m - Par 4
Playing back up towards the mountain and vineyards gives the illusion of your ball disappearing into this perfect backdrop. The fairway is wide and is protected by bunkers on the left and right. Club selection is imperative on your approach as not only is the green raised, but it has three distinctive tiers which can make putting challenging should you not be on the right level.
Hole 17 - 155m - Par 3
Played from a raised tee to a green set back in the old oak trees, this green is protected in front and on the left by the mountain stream. Your tee shot will require a precisely struck shot in order to find the putting surface. Due to the downhill and surrounding trees, the prevailing wind swirls around thus making distance control very difficult. Par three’s do not get much better than this great hole, and no matter what score you make, you will really enjoy this one!
Hole 18 - 505m - Par 5
Protected for the entire hole by the meandering mountain stream, this classic risk and reward par five gives the player several options for the drive, second shot and approach. The fairway splits three times before the green which leaves the player with either a forced or planned strategy depending on the situation.
The green is well protected by water and sand, and a par here will make the 19th even sweeter!
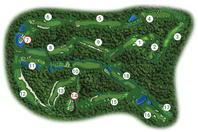
 The Steenberg Golf Estate has its own exclusive and private 18-hole championship Steenberg Golf Course that meanders leisurely through the S...